PICK YOUR AI THEME TO GET STARTED

DAY 2 | EPISODE 4
FORMS

Paul | 25:55 | 15 mins
Use the Form Builder to create your own Forms. Learn how to drop Forms anywhere on any page, and style them to seamlessly fit any design or page background.
Finish the session by learning how to set up payments and subscriptions via your Forms, and know how to link Forms to a Thank You Page and Notification Email.

LESSON PLAN

Forms Intro
Paul Davenport | 01:22
MOBLE Forms are styled exactly the same as your website, with your CSS, so they don't feel like a clunky embedded plugins or apps.
"In this episode you are going to learn how to customise your own forms, you're going to learn how to set up your own custom form fields, you're going to learn how to put forms onto a page and star them so they work on different Colour backgrounds. So, maybe on a light background or a full Colour background. We're also going to dive in a little bit deeper and have a look at how you can use forms to take both payments and subscriptions.
You can use both your online store to take payments and subscriptions, but you could also use that in forms too. But then we'll also have a look at the interaction between a form. What happens when someone completes a form. We want to take them to a thank you page, possibly with more information, but we also want to make sure they've got a nice email so that they know that they've submitted the form, but also so that you know they've submitted a form and they go into your bucket of leads in the inquiries area. And we also create them as a new member."

Forms Tour
Paul Davenport | 04:03
Take a tour around the Fours area. It's important to understand, before Day 3, that your Forms can be styled on both Light and Dark Backgrounds.
"So, here I am in the forms area and as you well know by now that you can get to the forms via the main menu and click forms. Well, here is a list of a whole bunch of forms that are pre-made for you as part of your Theme. So, we're going to have a look at some of these forms, but specifically immediately I'm going to be looking at the event form and the event light. I've got two variants of this form. So, to explain what's going on here, in the tabs at the top I've got a form here set up, which you can see my form is on a dark Colour background. And in the Editor we can see my form that's here. And if I click on the form, you can see the whole list of forms that appear. So, as we create and manage forms in the forms area, they appear in the dynamic list of forms in the Editor.
So, I'll just describe what's going on there. What I'll do is close this down. I'm just going to pop this into Design Mode so you can see. The form's actually living in this frame here, right? So, I'll just delete this and what I'm going to do is add a new form. So, you add a new form to a page using the components and I will embed now a new form. Now this particular form, I've made two variants of this form. I've made an event and an event light. So, event light has light Colour fields, an event has dark Colour fields. So, let's just have a look at this event light. I will save this now and we'll jump across to our tab. You can see that we have the light fields on top of this, but what I'll do is jump back in to the Editor.
I'm going to change this to my event form with the darker fields. So, what I mean by this, I'm just going to press save and I'll jump back into the tab and hit refresh. Let's scroll down. You can see that these have got dark fields. So, when we're creating forms, I like to create two versions for my content team because I don't know where they're going to place this form. Are they're going to place it on a dark background or are they going to place it on a light background? So, if it was the light background, let me just show you this. I'll come into here and I'll take out our gradient. I'll just pop in our neutral. I'll actually just change the text Colours in here as well. Let's just make sure that we can see this as I save this so we can see on the front end. So, I'll just save. Let's come back in here and hit refresh.
And now you can see our form on a light background. So, here we've got the form that's called event, and previously we were looking at the form with a light fields called event light. So, let's have a look at this. We've got event and event light, so keep that in mind. So, now we're going to do two things. We're going to go and edit this form that we've got here, and edit means we customize all of the fields that go within the form. And then the second thing we'll do then is go and look at the settings tab. Now the settings is where we control all of the stylings, like light and dark that we looked at there, but also as we mentioned in the introduction, where we go to set up the interaction that happens after a form is completed.
So, that is the landing page that they go to when they've completed a form, the email they get when they've completed a form, and whether you want to get notified yourself via an email and also whether you want to turn the person that submitted that form into one of your members."

Edit Form Fields
Paul Davenport | 04:36
Add Form Fields and Drag and Drop them into position.
"So, let's do it. Let's go into this event form here. So, we'll look at event light first of all, let's go into this. And here you can see all of my fields. So, this has got a few different types of fields here, hasn't it? This one is what we call a multi selection list, and this one is what we call a text.
So, there's a few different types of fields, isn't there? Well, I can change the field type simply by clicking at the top here. So, you can see we can assign different types of form fields here. We've got a text, mobile, email, password, date, number, web address, text area, dropdown, radio, checkbox and multi selection list. Well, I think most of those are quite self-explanatory. If you built any websites or done any kind of CRM activity before, these will be familiar to you. The key ones in here is mobile is the one that you should use for a number. I tend to use mobile rather than number all the time.
Mobile means when they go and submit the fields, it will automatically come up with numbers rather than text, which just is a nicer interaction. So, if you're using a phone, I would get into the habit of making sure you select a mobile field. So, that's tip number one. Let's go and have a look at mine. I've got a mobile field here and I'm using mobile. A lot of people will say the word phone. So, you could change the label here to phone and still use mobile. So, keep that in mind. I always just like to get a mobile these days, because it's much better for the quality of the data that you are receiving. As we looked at there in previous episodes, MOBLE's philosophy, M-O-B-L-E, motivate is get a mobile or email address. So, we're always looking to capture that information on our forms.
All of that I'm going to cover with you in day five, but it's super important we try and get as many email addresses and mobiles as possible as we build up our database. Why? Because if you've got that information, you can market to those people for free forever, and so you reduce your reliance on ongoing advertising. Of course, save a lot of money that way. So, if I wanted to add a new field here, I could simply come in here and I could choose a different type of field. So, in this one I could put web address and in here I might put website, we're going to capture their website. And then do I want to make this mandatory? Do they have to complete this field? Well, I'll say no at this stage because it might be someone without a website and I will click tick.
Now I could move this to anywhere where I want it to go simply by dragging and dropping. So, that's the way it works. I'll now delete this website field. Now I'll go and look at some of the other fields that we've got here. So, I think you get all of these. The questions I get is what's the difference between text and text area? Text is one line and text area is multiple lines. And with the text area field, they can actually drag the space when they're completing it, which makes it easier for them to fill out. So, that's that little drag icon on a text area. So, if this is an inquiry field or leave a note, leave a message, whatever you want to say, it's nicer to use a text area than just a normal text.
So, that's the first type of field I'll drawer your attention to. Now, a dropdown is just a straight dropdown. Radio are actual toggle buttons, check buttons, and a checkbox gives a little tick in a checkbox. A multi selection list, well, that's what we've got here on our front end where people can select multiples. So, you need to decide which ones that you are going to use there. So, that's a quick introduction to field."

Your Tasks
Paul Davenport | 01:56
Your task is to look at the pre-made Forms and decide; which ones you will use, and what fields you need to edit. You can Create and Clone as many Forms as you like.
"So, I think you should be very capable to go and create your own form fields. Have a play with it. Always remember with the form to test it. So, what you're testing, you're testing the email that your customer receives and the email that you receive. We want to make sure that data is complete.
So, enough about that, I'm going to let you go and have a play and make a few forms. If you want to make a new form just to play with, it could be a good idea. So, you can go and add a new form, give it a name like test form or Sarah's form, whatever you want to call it. And you can actually start by one of the pre-populated forms anyway. So, it's a good idea to start with the standard form because that'll give you the basic information like name, email, and mobile and a nice text area. So, top tip there, make a test form and start with a standard, hit create, and here you can see a nice form field.
This one automatically has the nice subscribe link in there for you as well if you want to make sure that people opt in. The top tips there, well, test, number one. Go and create your own test form and have a play with some of those fields. Familiarize yourself with the different types of fields. And then what we're going to do later on in this episode is drop your test form onto a page so that we can go and do a test submission and check out that landing page, but also the email that your customers are going to get."
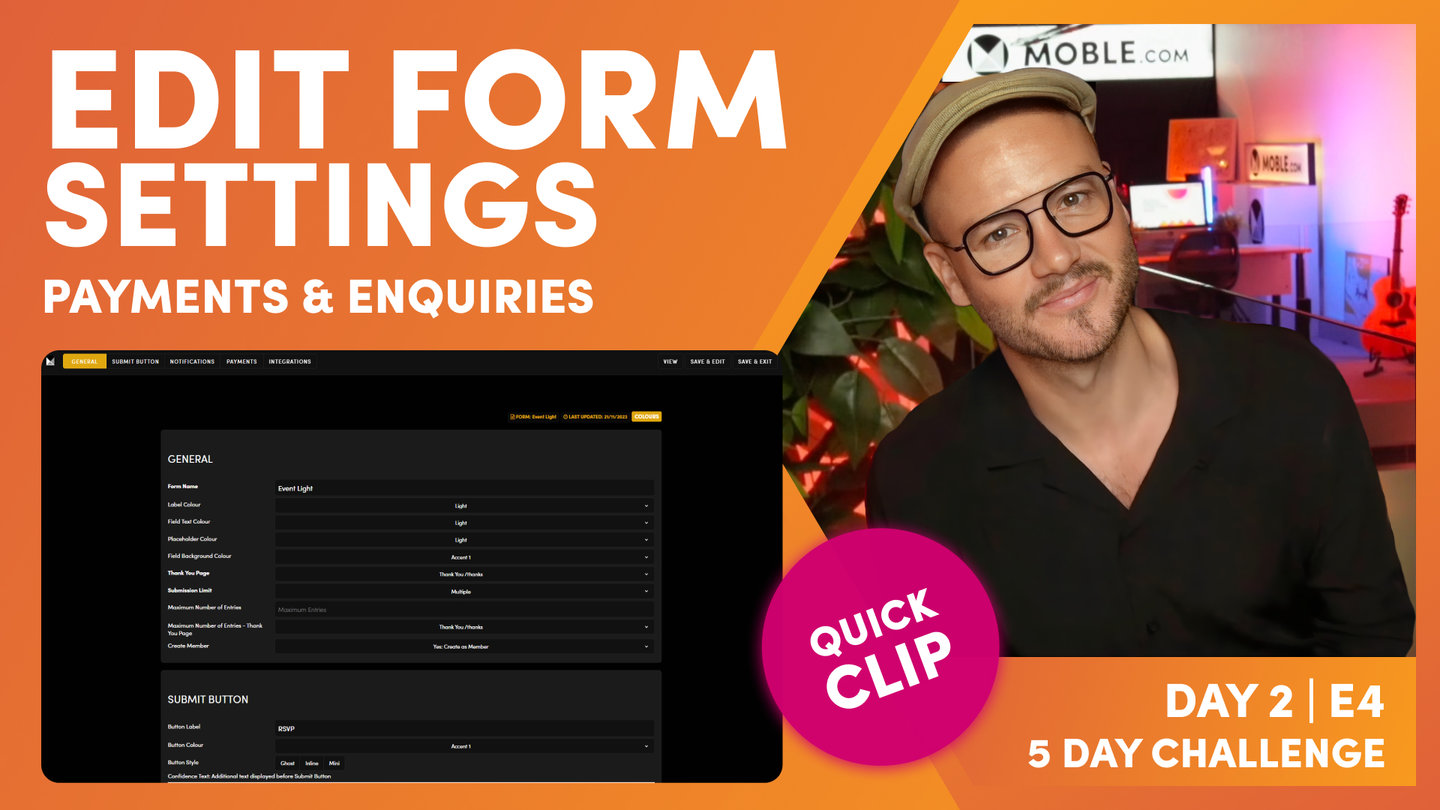
Edit Form Settings
Paul Davenport | 05:57
It's important to pay attention to the Form Settings and familiarise yourself with all the functionality before your go Live.
"So, what we can do now is we've just looked at the edit page. So, we can also click the settings page, which as you know now will go to a black screen where we've got that meta information. But I'll just show you something else. So, what I'm going to do here is click edit, go back into our form and I can access the settings here, which takes me through to the settings in exactly the same way. I can click view also and I can see the page of where this form lives. If it is living on a page, I can see the complete list of pages where this form lives, which helps me go and test. So, if I click one of these, again, it opens up in a new tab. So, a few top tips on just getting around and making that testing a little bit easier.
So, I'm going to click in settings here, which as you'd expect, takes us to the forms setting the area. So, let's just have a quick tour of here. We've got the general information at the top. We can anchor down to the submit button, we can anchor down to our notifications, our email notifications, and of course we've got payments which we've talked about. And at the bottom we have integrations. So, general information. Well, each form you can give a name. Now just remember only you and your logged in team see this name. And that's important here so that you can identify which form is which. Well, here we've got our event light, but if you are in marketing or if you are using a marketing agency, they might also create multivariate forms. So, they might want to test certain things like reducing the number of fields that you have.
Does it increase the conversion rates? That's a very common thing that people are going to test with forms. Less so these days is the button label. Historically we'd do a lot of testing on button labels. We worked out years ago that if you type in the words submit, you may as well just type in absolutely nothing, because it doesn't make a difference. But these days people know what a button is against a form. So, you don't have to be too verbose in your description, in your form label. You can just say RSVP, book, buy, maybe next, and people tend to know what it is these days. So, don't get wrapped up too much in your button label. I'd say just keep it short and sweet. Now the other thing is that you can see here we've got lots of Colours. Now we are replacing these Colours with swatches.
That's coming in the second quarter of 2023. Why aren't they there now? Well, as you know, MOBLE is a system that we built for our own agency and we're rolling it out now across the world so that the entire world can share these tools that we've built for ourselves. So, there's a roadmap of just tying up the last few things to improve the UI. So, what we've done is a temporary feature is we've just put a link to the Colours area up here so that you can see all of your accents. So, it's main neutral accent, one, two, three, four, five, six. And then you've got your light and dark. So, just use that as a reference for now. If you are watching this as from the second quarter of 2023, well, you'll see the Colour swatches here anyway, not a dropdown. Cool stuff. So, let's race through each of these Colours so that you know exactly what they are.
Well, here you can see we've got label Colour, which is obviously the main label Colour. Very straightforward. But we've got the field text Colour, so this is not the placeholder. Here you can see a placeholder. You could write some descriptive words in here in the placeholder, but when someone types in the text, this is the text Colour. So, we've looked at text Colour there and the placeholder. So, text Colour is after, placeholder is before. Then we've got the field background Colour. Now MOBLE, we've got a few different types of forms. So, sometimes we've got forms with an actual field with a full background Colour, but sometimes we just use an accent line. So, this blue accent is accent one, isn't it?
So, you can see here that our field background is accent one. So, pretty straightforward stuff there, and you can see it's the same with the button Colour that we can control. Notably with the button Colour, I'm on my pink, accent six. If I was on my accent one, which is that lighter sky blue, I might choose to have it in ghost. We know that in line is the size of the button text. Take in line off, and it's going to be the full width of the frame. And then mini is a smaller height of a button as well."
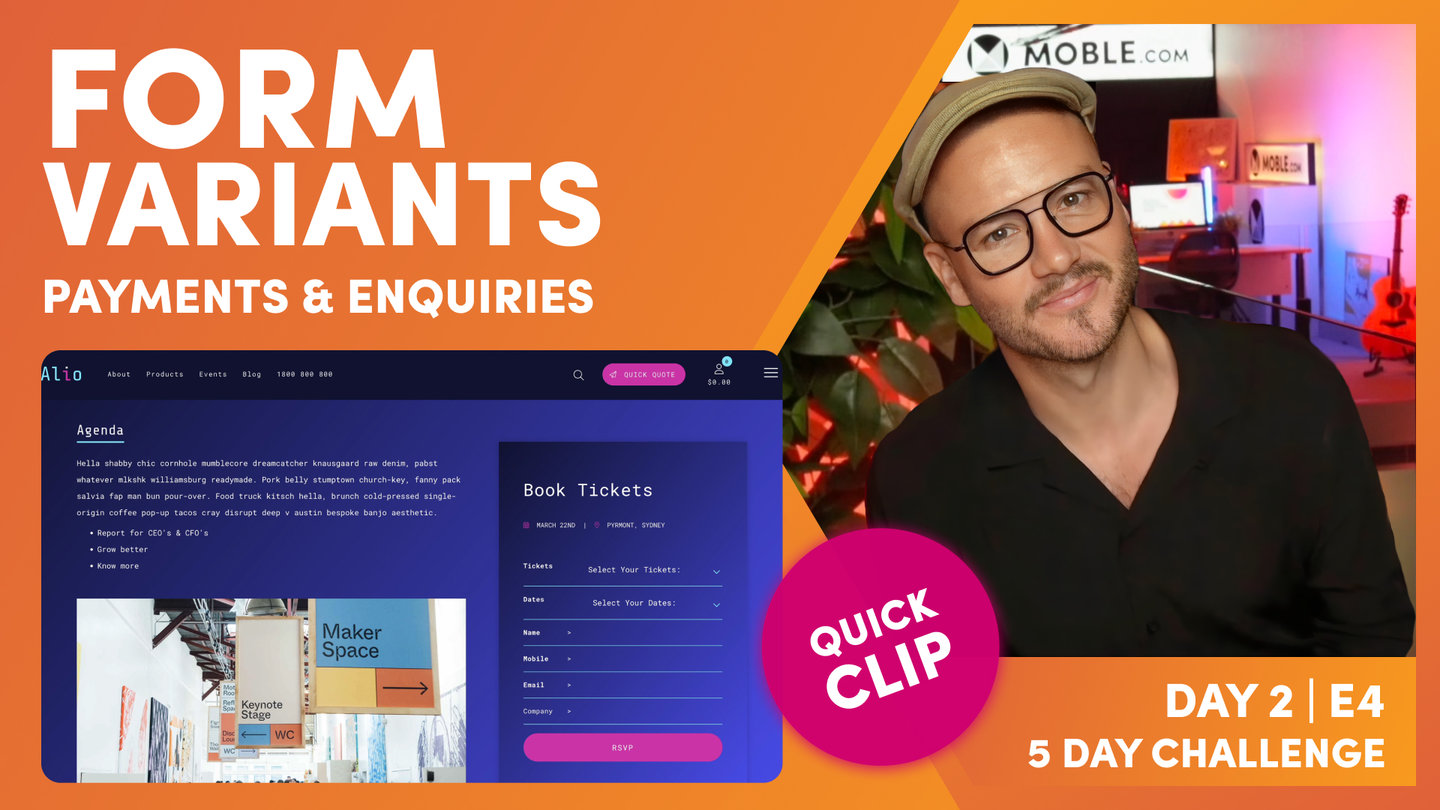
Form Variants
Paul Davenport | 05:57
Clone Forms to make variants, which can be important when Forms are required in both Light and Dark backgrounds, and also, if you're testing variants in your marketing campaigns.
"So, now you should be able to style your forms and also rename them so that you can make variants. Well, I'll just show you one quick tip for creating variants. And if we just go back into the main forms area, what I'll do is show you the clone button. So, you can see here the clone button. So, if you are making variants like changing from one Colour to the other, I wouldn't change the main Colour. I would just simply click the clone, create a variant, rename it, and then go and put your Colours in. And now you've got a nice variant which will appear in your Editor, in your dropdown. If you've got an Editor and you're wondering if you've just created a new form and you're wondering where it is, if the Editor's always open, just remember to save and hit refresh and that will update the list of that dynamic content and it will feed into your list.
So, pretty straightforward stuff, you should get that by now. That's the concept of MOBLE with dynamic, whether it's a widget pulling in information, whether it's a form pulling in dynamic forms or whether it's a menu pulling in dynamic menus. It all works the same way with your dynamic content."

Thank You Pages and Email Notifications
Paul Davenport | 05:38
Learn how to create and assign Thank You Landing Pages to follow your customers Form submission. Learn how to create Thank You Emails and decide if each Form should have an Email Customer Notification and if people if your team wish to be notified with an Admin Email Notification.
"So, let's push on. Let's go back to our form and let's look at the thank you page where you can see here this is a thank you page and the URL is /thanks. Well, it's bringing in a whole bunch of other pages. These are all pages that are live or hidden.
They're not landing pages, they're not blogs, they're not products, and they're not sections. These are thank you pages. So, you can see here, thank you pages. So, let me go into the pages area and let's make sure we know how to find those. You'll know this from the earlier episode. If I go to pages, again, just open a new tab. Now I'm looking for pages that are live and hidden. I could just type in a word like thank, and that would just bring up any pages. Now with my thank you pages, I like to tag them "thank you page." That way if I was looking for my pages, I could just go thank you page and search for that thank you page.
Now I could make clones and name them in nice ways as you've already learned. I always use the tag notification as well because we've got different types of notifications. So, let's just go and look at this notification and I'll now look for sections. And you can see that we've got email templates too. So, this is the body email. So, this is really plain text. If I'll just open this in a new tab, you can see I've just got some plain text here that will inject into the body of an email. So, that's a notification. So, we've got our thank you page. Let's open this up as a new tab, which is styled.
This one's got a background image and some text. We could make this more legible, as you'll learn in later episodes. I would probably put an overlay on this. So, we'll go and fix up this thank you page in a later episode. And we've got our thank you email. So, back into our form. We know that this one is the thank you page. And if we go down to notification, this one is the thank you email. So, yes, send the confirmation email. Now, email, body text. I can now assign this to our section. So, here's a list of all of our sections. And you can see here this particular section is thank you email. So, I would attach that so I can write different thank you emails for different forms. I could use the same thank you email for the different forms as well. So, that's a nice way to work.
So, just so you know, thank you emails are sections. Thank you pages are pages. So, that should be pretty self-explanatory there. You can mix and match your pages and then you can mix and match your thank you emails too. So, now with button, that's pretty obvious. We've looked at the label, we've looked at the Colour, and we've looked at whether it's ghost, in line or mini. And confidence text, it's just sometimes you want to run some text that can go above or below that button. Maybe it's just we do not spam or something like that. So, you can play around with that in your conversions to include some confidence text as well. But we've just looked at email notification, haven't we? Now the good thing about your forms, you can set them up so that many different people can receive this notification.
So, let's have a look at that. Well, this is the customer notification. This is the email that they will see when they receive it. So, what you want to do is set up your email with your company name or department as well. That's in text. And then you want to put it in this bracket like this, and then you want to put in your email address that they see. And of course they can reply to this email too if they hit reply. So, make sure you choose a nice tactical email there for the customer notification. Well, what's admin notification here? Well, you can see here, this is who in your team is going to be notified when you receive it. So, in this case, I've got Paul and then my email paul@blio.com.au. Now if I was to add someone else, I'd just put a comma, no spaces and the same format again.
Now I can put the subject line of what the customer sees in their email and I can put a title, which is the main title that goes above the body text that they'll see there too. And then we've just talked about the body content. So, all that should make sense. All I'm saying at this point is I want you to test all your emails and forms all the time before you send them, and get into that habit. Never put a form live without testing the email. Now, if you don't want to have an email sent to the customer once they submit, which is totally normal, you might just want them to go to a landing page, then you can put, "Don't send customer notification email." And if you don't want that email either, you can say, "Don't send confirmation email and admin notification.""
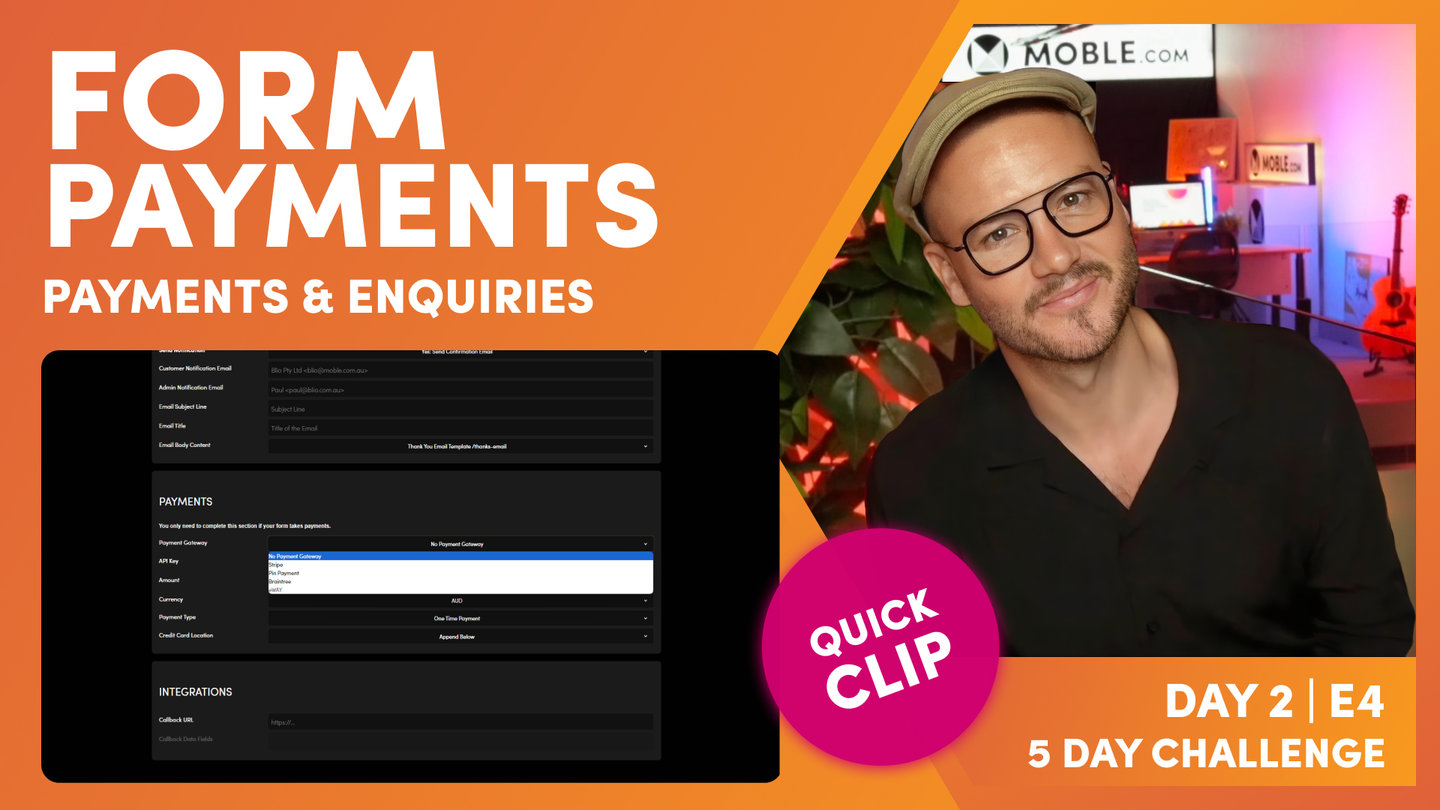
Form Payments
Paul Davenport | 03:16
Your Forms can take Payments and Subscriptions from inside the page, without your Customers needing to Add to Cart or go to a Checkout. You might opt to use Form Payments to acquire low friction sales directly on your Landing Pages.
"Now, finally onto payments here. As I've said, your forms can take payments, so you need to give it a payment gateway. Well, we've got a few different types of gateway. Now, if ever in doubt, you're best off using Stripe, it is the easiest to set up. Now, when you set up Stripe, it will ask for a live API key. It also gives you a test API key as well, but make sure it's a live key. So, this will start with SK_live_ and then your ID. So, make sure you put in your live API key. You can put your currency, whether it's Australian dollars or US dollars, and then the payment type. Is this a one time only payment? So, are you just accepting $9 once? Or if it's a subscription, are you requesting $9 a month?
So, we've got one time and subscription. Now with your credit card form, you can do two things. You can put the credit card information on the same page below, or you could have it appending next. So, this will put a next step. So, you've got their customer information, they'll go next, and then the credit card will appear. So, the very simple way to take payments. So, the only thing I'll show you now, and we'll come onto integrations in later episodes, we're going to have a whole section on integrations. Integrations just mean do you want this form to go into your CRM, or do you want it to go into another CRM like MailChimp lists and things like that?
So, look out for that in the integrations, but anyone that fills in this form, you can send them to say a MailChimp list, which is super, super useful. So, I'll just show you now how we set up a payment type. So, what I'm going to do is go back into the form and I'm actually going to add a pricing field. So, what I can do now is add a new field, and in this case I might decide to choose a dropdown. And now what I want to do is give it a price. So, I can say something like $9 per month. And then on a new line, I could say 49 per month. And then on the next line I could say 79 per month. Now I can set this as a price, and at which point it creates a pricing table. So, now over on the front end, the customer can check one of these and then it will apply that credit card information so that they can submit it. And that is everything that I want to show you on the forms episode."
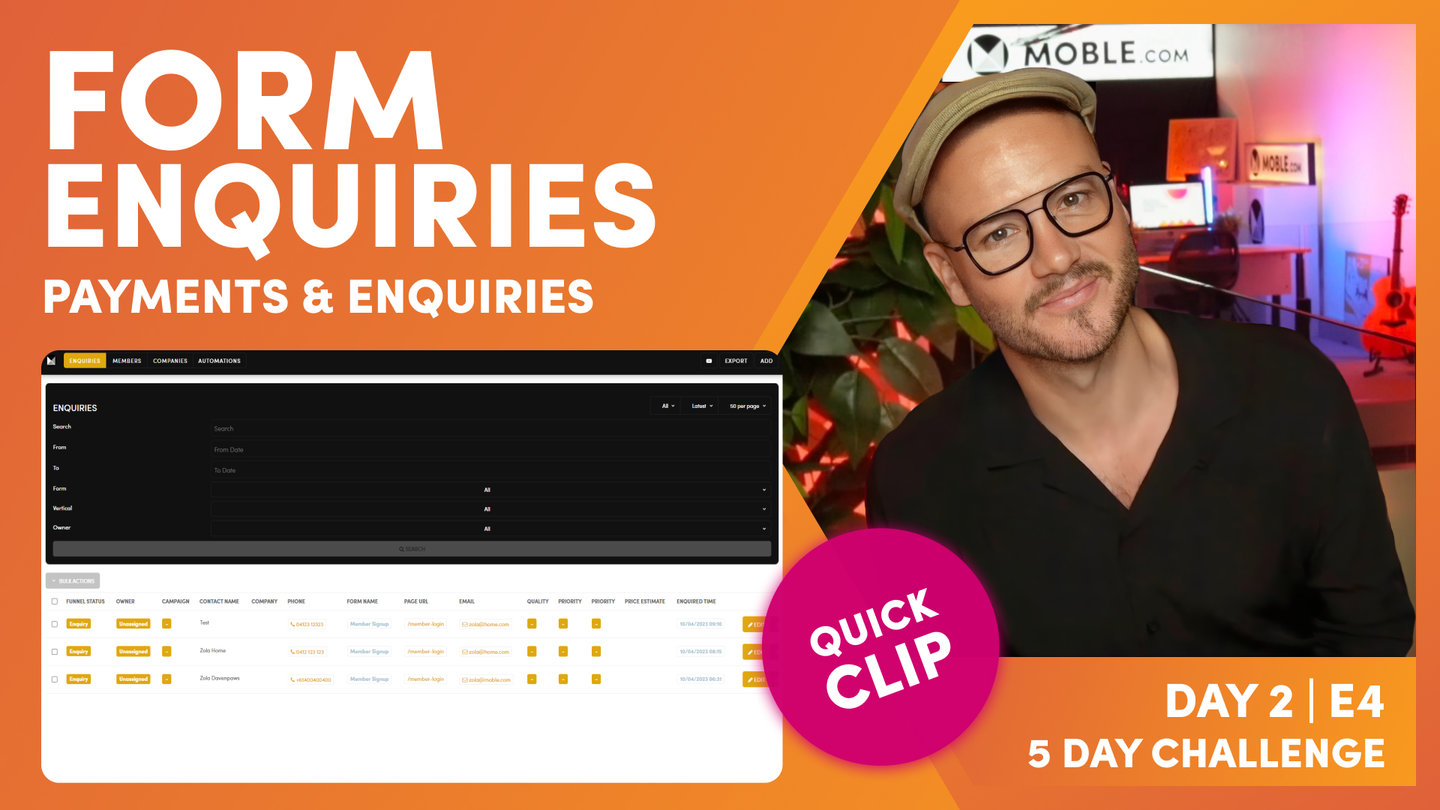
Form Enquiries
Paul Davenport | 01:27
All Form Submissions are logged in the Enquiries area, where you may review all the data and export for use in your internal systems.
"So, I think we'll wrap there only to say that on day five we're going to be exploring forms some more. We're going to be looking at turning your form submissions into members and putting those members into groups, which is all managed in the contacts area. So, here is the contacts area, and you can see this is a list of where all your inquiries appear. So, you don't just get your inquiries via email, you keep a log of all of your leads that come in by the website here. And if those members subscribe, they go into a member list where you can also look at all the different companies that have inquired.
So, you get your contact and they live inside a company. And then of course you've got all of your automations, which is what we're really going to be diving into in day five. Making sure that if someone submitted a form, you can send scheduled emails and scheduled SMSs and scheduled WhatsApp messages to them sequentially within a funnel. And that will all be coming up in day five."
TEXTBOOK
A user guide to Forms
1. ADD FORMS TO PAGES
There is no question that Forms are the single most important part of your website for capturing new enquiries and enriching customer data. You might use forms for lead generation, taking online payments, event bookings, or even asking customers opinions. So it 's well worth understanding where to create them and how to add them to your page, and in this Episode, you'll learn just that.
There is no question that Forms are the single most important part of your website for capturing new enquiries and enriching customer data. You might use forms for lead generation, taking online payments, event bookings, or even asking customers opinions. So it 's well worth understanding where to create them and how to add them to your page, and in this Episode, you'll learn just that.
WHERE DO I CREATE FORMS?
Forms are located via the Main Menu.
- Click the Main Menu in the Top Left
- Then, click Forms
Here you will see a selection of pre-made forms for you. You may edit these forms as you wish. In the next Episode, we'll take a close look at Editing forms and what each feature specifically does.

The Forms area on MOBLE can be used to add new Forms, and Edit or Clone existing ones.
HOW TO ADD A FORM TO A PAGE
In the Layouts Drawer notice many Layouts with Forms have already been set up for you. Simply find the form closest to what you're looking for and drag it on to your page.

Drag and Drop Widgets from the Layouts Drawer on to your Page.
The Visual Page Editor simply lets you select the Form that you have created in the Forms area. Simply add a form to any Frame:
- Use the '+' Icon in the Frame Tools to add new Components to the Frame.
- Then, select your Form from the list of Forms that appear in the Form Component.
- Consider playing with the background colours of your form to make your Form prominent on the Page.
You can change the Form Fields, Form Label and Buttons colours, plus Form Preferences over in the Forms area. The Visual Page Editor is simply for selecting Forms that you've already created.
You can add Forms to any Frame. It 's a great idea to apply background colours to the Frame to make the form pop on the page.
2. TYPES OF FORM FIELDS
Next, you will learn the Types of fields you can add from a basic Text Field, to creating Price Fields for online payments.

FORM FIELD TYPES
TEXT FIELD
The Text field simply lets your users input text to their form submission.
Typically, Text Fields include First Name, Last Name, Company etc, but can really be for anything you wish to capture.
NUMBER FIELD
Number Field is useful where you only wish to capture numbers from your users.
If your user attempts to input 'non-number' characters into the field, on submission, a validation message will automatically appear informing your user that they may only add numbers to this field.
EMAIL FIELD
As you would expect, this captures your user's email address.
Email is a special field since all forms must contain an email address to allow for reply correspondence and anti-spam. Therefore, this field may not be deleted from your forms.
PASSWORD FIELD
In forms where you are onboarding new members, you may ask for a password.
By default, a password should be at least 6 characters in length.
On MOBLE there is a standard 'Member Signup Form' that is pre-made for you. We suggest you begin with this for your member's login area. Though of course, you may have as many member signup forms as you like, especially when creating signups forms for different member groups, with access to different pages.
DATE FIELD
Date Field is useful where you only wish to capture a date from your users. A calendar popup will appear as soon as your users start to type in this field, allowing easy input of their preferred date.
If your user attempts to input a 'non-date' character into the field, on submission, a validation message will automatically appear informing your user that the may only add numbers to this field.
The default date format is dd/mm/yyyy, an indication of this is pre-populated in the 'Placeholder' fields automatically for you.
WEB ADDRESS FIELD
Web address field asks your users to input a website address.
This field does not have any character restrictions nor any validation messages.
TEXTAREA FIELD
Textarea allows multiple lines to be inputted by your user.
By default, unlimited characters can be inputted, though you may control the maximum number of characters in the 'Max # of Characters' field.
DROPDOWN FIELD
Dropdown is an 'Option' field that asks your user to select only one item from a dropdown list.
To create your options, simply add your options, starting each new option on a new line.
RADIO OPTION FIELD
Radio is an 'Option' field that asks your user to select only one item from a selection of options.
To create your options, simply add your options, starting each new option on a new line.
CHECKBOX OPTION FIELD
Checkbox is an 'Option' field that asks your user to select multiple items from a selection of options
To create your options, simply add your options, starting each new option on a new line.
MULTI SELECTION LIST OPTION FIELD
Multi Selection is an 'Option' field that asks your user to select multiple items from a selection of options
To create your options, simply add your options, starting each new option on a new line.
PRICE OPTION FIELDS
All for option fields may be used to display pricing and to take a payment online.
To add a price field:
- Select one of the Option fields, either Dropdown, Radio, Checkbox, or Multi Selection.
- Add your Options, ensuring that you start each new option on a new line.
- To add a Price simply include your Price in the Option text field.
- If you have two numbers in your option, then the Price is the first number that appears e.g.
$5 for 3 shitake mushrooms
$10 for 30 shitake mushrooms - Finally, click the checkbox to 'Set Price Options' and your option pricing will display in a table for you to review.
- In the Forms Settings area, you may set up your payment gateway (e.g. Stripe), your currency and the type of payment (e.g. one-time payment or a subscription).
Quickly add Price Fields for your Forms to take One-time and Subscription Payments.
3. FORM SETTINGS
Once you'veset up your Form Fields it's time to head over to the Forms Settings area to set up the preferences for your form. In this Episode, you will learn each feature in the Forms Settings so that you can get set up quickly.
You can also access the information below, as and when you require it, by clicking the Question Mark Icon next to each field in the Forms Settings Area.
GENERAL FORM SETTINGS
FORM NAME
'Form Name' is essential to help you identify your forms. Form Name can only be seen by CMS users and is never shown on the front of your website.
LABEL COLOUR
'Form Label Colour' is extremely important on MOBLE since you can add forms on any background colour or image, anywhere on your page. Therefore, it's important to choose a Label Colour that is clearly legible on top of your backgrounds.
If your website design has light and dark backgrounds, you might consider making two forms variants, one with a light Label Colour, the other with a dark Label Colour. You have 10 colour options with Primary and Secondary, Light and Dark, or any of the 6 other Accent colours.
In the Forms Area, you can use the Clone button to make a copy of any form, then simply change the Form Name and Label Colour (and possibly the Button Colour), to have both light and dark variants of your Form.
THANK YOU PAGE
A 'Thank You Page' is the page that your visitors are taken to once that have completed a form. You may select from a list of the Pages on your website.
Typically, a Thank You Page is used to inform your visitors of the next steps following their form submission.
You might also use it to introduce new products and services, newsletter and membership signups, or perhaps even links to your social media pages.
SUBMISSION LIMIT
'Submission Limit' determines the number of times a user is allowed to submit a form which can be important for signups to events for entries to competitions.
- Multiple: The default option is to allow for multiple forms to be submitted this is standard for forms like Contact Forms and for general enquiries.
- 1 per Email Address: As the name suggests this option only allows one submission per email address and is useful for Competitions, Giveaways, and Signups.
MAXIMUM NUMBER OF ENTRIES
You can define a 'Maximum Number of Form Entries'. This is the maximum total number of entries that a form can be submitted. E.g. A survey or competition that will accept only a set number of responses.
You can use the Maximum Number of Entries in combination with a Submission Limit. A Submission limit defines the number of submission from the same email address.
Example:
You would like to run a survey and obtain the results from 100 visitors.
You would set the Submission Limit to 1 per Email Address and the Maximum Number of Entries to 100.
MAXIMUM NUMBER OF ENTRIES THANK YOU PAGE
If you have set the 'Maximum Number of Form Entries', often you might wish to have a different thank you page for those people that submit the form before, and those that submit the after, the maximum number is reached.
'The Maximum Number of Entries' is a special option to inform those people that submit a form after that maximum has been reached. Most likely to inform them that they have missed out on the offer/promotion.
You may select from a list of the Pages on your website. Therefore, you should head over to the Pages area to create a new Page before linking it to your form.

The General Form Settings are essential to complete for each form
FORM SUBMIT BUTTON
BUTTON LABEL
Form 'Button Label' allows you to control the text that sits inside the submit button of your forms. Button Labels can influence the conversion rate of a form, so it's important to understand some basic rules to get you started...
BE CONCISE AND DESCRIPTIVE
Don't confuse people, or be too creative, just tell your user what they can expect.
USE COMPELLING VERBS
- Try
- Join
- Start
- Discover
- Learn
- Save
BE PERSUASIVE
- You
- My
- Free
- Easy
- Proven
- Guarantee
- New
CREATE URGENCY
- Limited
- Last Chance
- Hurry
- Closing soon
- While it lasts
- Only Today
- Ends on "x"
BUTTON COLOUR
'Button Colour' allows you to select from the Primary, Secondary and Accent Colours that you set up for your brand in the 'Styles' area.
USE CONTRASTING COLOURS
You have many colours to choose from in your colour palette, found in the 'Styles' area, so always pick a colour that has the most contrast allowing it to jump off the page.
Your Forms on MOBLE sit in a frame allowing you to change the Background Colour of your forms in moments. Therefore, it can be a good idea to create form variations with different colours allowing you to select the right form for the right instance.
BUTTON STYLE
'Button Style' offers different looks for your Form Submit Button to enhance your design and help them stand out.
USE CONTRASTING COLOURS
The following styles can be applied to buttons:
- Ghost: 'Ghost' button applies a border, or stroke, around the button with a transparent fill.
- Inline: Selecting 'Inline' will contain the button to the size of the words. Unselecting 'Inline' will make the button stretch to the full width of the frame in which it sits.
- Mini: 'Mini' is the smaller variation of the button. The Mini button is smaller in height and also in horizontal padding on either side of the image.
CONFIDENCE TEXT
'Confidence Text' allows you add confidence builder text directly above your submit button.
It's a good idea, reflect honesty about your intentions in your own voice, in a way that will resonate with your audience. Here we look at some common types of confidence builders that you might consider expanding upon:
EXAMPLES
- We don't spam
- No Credit Card payment required
- We respect your privacy

The Form Submit Button can make a difference to your conversion rate
FORM EMAIL NOTIFICATIONS
SEND NOTIFICATION
'Send Notification' allows you decide if you would like to send an email notification to your users once the submit a form.
To send an email notification, simply select 'Yes' to send, and continue to complete the other notification settings.
CUSTOMER NOTIFICATION EMAIL
'Customer Notification Email' is the email address that your customer sees when they receive an email notification after completing a form.
You can add multiple email addresses by separating each email address with a comma. E.g. team@moble.com,info@moble.com.
ADMIN NOTIFICATION EMAIL
'Admin Notification Email' is your preferred email address for receiving email notifications after a customer completes a form.
You can add multiple email addresses by separating each email address with a comma. E.g. team@moble.com,admin@moble.com.
EMAIL SUBJECT LINE
'Email Subject Line' allows you to control the subject line that your customer see before they open the email.
EMAIL TITLE
'Email Title' is the main title of your email Customer Notification Email. This sits above the body of your email and is seen by your customer when they open your email.
You do not have to complete this field. You might decide to create your own title in the body of your email, when you create your Thank You Email page.
EMAIL BODY CONTENT
Thank You Emails should be created as Pages and marked as "Hidden", "Sections". They can be found in the Pages area when you Search for "Hidden", "Sections".
You might decide to clone a Thank You Notification Email Page. Just keep in mind that when you clone a page, it automatically flips the Page into Draft Mode. So if you can't see your page after you've cloned it, ensure you have "Hidden" and "Draft" highlighted.
There are standard Layouts for Thank You Pages and Thank You Emails that you can drag and drop on to your page.
In the Page Editor, simply open 'Layouts' > Sections > Notifications
Thank You Notifications are free pages and do not count as part of your Page allocation or billing.

The Form Email Notifications can be customised for every form.
FORMS PAYMENTS
FORM PAYMENT GATEWAY
A 'Payment Gateway' is software that allows you to securely take payments over the internet, and sits between your website and your bank. Here we look at the Payment Gateway options on MOBLE.
STRIPE
Stripe is MOBLE's default Payment Gateway. It has favorable rates, is advancing rapidly and is arguably the leading platform on the planet and is prominent in many counties across the Globe.
BRAINTREE
MOBLE is proud to offer Braintree as a Payment Gateway option. At the time of writing MOBLE is in the final phase of testing our Braintree integration. Please speak with us if you require this option immediately.
https://www.braintreepayments.com
EWAY
eWay is available to Australian users and is often used if you already have eWay established and you are moving to MOBLE. eWay is located in Canberra and have branched out to other countries around the world. please contact us if you have any questions regarding setup or custom developments.
PIN PAYMENTS
Pin Payments is another great option available to our Australian customers who are looking to support local businesses. Pin Payments is located in Melbourne and have an excellent focus towards small business.
FORM API KEY
To connect your 'Payment Gateway' to your MOBLE form you simply need to add the API Key of your Payment Gateway to your MOBLE Form.
Once you have signed up to your Payment Gateway you can log in to your Payment Gateway account, copy your API Key. Then head back to your MOBLE Form and paste it into the API Key field. Once you click Save in the top right, your form will be set up to receive online payments.
The image below shows where to find your API Key on Stripe. You need to copy the Live 'Secret' Key (SK).
The image at the bottom of the page shows where to paste the API Key on your MOBLE form.

A Payment Getway can be integrated with each Form. Here we see it is as simple as copying the API Key from your Payment Gateway to you MOBLE Form.
PAYMENT TYPE
'Payment Type' allows you to take either "One Time Payments" or "Subscription Payments" via your MOBLE forms. In the Episode, we take a look at both.
MOBLE Forms can be used to take payments online via your forms. The first step is to add price fields to your forms by selecting form option fields. If you haven't done so already, consider reading this Episode to help you decide which is the best option field for your form.
ONE TIME PAYMENTS
One Time Payments is the default payment type this allows you to take one payment at a time from your customer.
E.g. You are selling 3 eBooks for $9, $29 and $79. The customer selects their preferred option, and purchases it once, by adding their card details and submitting the form.
SUBSCRIPTION PAYMENTS: CURRENCY
Subscription currency is simply the currency that you wish to receive for your subscription payments.
By default, MOBLE's Stripe Integration allows for:
- USD
- AUD
Other currencies are also available depending on your Payment Gateway and your Bank account.
SUBSCRIPTION PAYMENTS: INTERVAL
Interval is the frequency of which you wish to take the recurring payment. By default, MOBLE has options for:
- Monthly
- Yearly
Daily and Weekly are also available, please contact our support team for assistance, should you require these options.
SUBSCRIPTION PAYMENTS: COMMENCEMENT
- Pay in Arrears - Payment cycle begins after the first interval.
- Pay in Advance - Payment cycle begins immediately.
CREDIT CARD LOCATION
You can choose your 'Credit Card' location for your forms. Your credit card fields can either be appended directly below your form fields, or you can elect to append the credit card fields as a next step.
Appending credit card fields as a next step is popular on MOBLE. Having Steps condenses your form on the page, which often makes for a nicer design. It is also proven to enhance conversion rates with apparently shorter more appealing forms. On the first step, you can capture a short set of fields such and Name and Email, and on the next step, you can capture the credit card information.
FORM INTEGRATIONS: ORTTO
MOBLE Forms have an 'Ortto List Integration' so that when a user completes your form on MOBLE, they will be automatically assigned to your preferred Ortto List when they subscribe. When you create a List in Ortto it will automatically appear here in MOBLE.
As you can see in the image below, you simply begin typing and MOBLE will autocomplete your Ortto Lists as you type. The form below is linked to 3 Ortto Lists: Social Pro, Content Pro, UX Design Pro. You can assign users to as many lists as you like.
MOBLE and Ortto are seamlessly integrated so that as soon as new Lists are created in Ortto they will automatically be available in the dropdown list.

MOBLE's Integration with Ortto List allows you automatically send Form Subscribers to your Ortto List.
FORM INTEGRATIONS: MAILCHIMP
MOBLE Forms have a 'MailChimp Audience Integration' so that when a user completes your form on MOBLE, they will be automatically assigned to your preferred MailChimp Audience when they subscribe.
Here we show you where to find your MailChimp Audience ID and where to find your MailChimp API Key in your MailChimp account and where to paste them in MOBLE to integrate your MOBLE website with MailChimp.
WHERE IS MY MAILCHIMP AUDIENCE ID
Click the Settings drop-down and choose Audience name and defaults. In the Audience ID section, you'll see a string of letters and numbers. This is your audience ID.
- Click 'Settings', then the 'Audience name' and defaults".
- Copy your Audience ID
- Head back to your MOBLE Form and paste it into the MailChimp Audience ID field
PLEASE NOTE
Before MOBLE Forms can be assigned to MailChimp Audience you must first add your MailChimp API Key.
To find your MailChimp API Key:
- Login to your MailChimp Account
- Go to Settings
- Click your profile name to expand the Account Panel and choose Account Settings.
- Click the Extras menu and choose API keys.
- Copy an existing API key or click the Create A Key button.
- Go back to your MOBLE Global Settings Area (Found via the top left Menu Icon)
- Paste in the API key to the MailChimp API Key field and click Save.

MailChimp API Key & List ID seen here in the Integrations section of the Global Settings Area
FORM INTEGRATIONS: ACTIVE CAMPAIGN
MOBLE Forms have an 'ActiveCampaign Tags Integration' so that when a user completes your form on MOBLE, they will be automatically assigned to your preferred ActiveCampaign List when they subscribe. When you create a Tag in ActiveCampaign it will automatically appear in here in MOBLE.
ActiveCampaign Tags and Lists
Lists and tags are the main methods to group your contacts on ActiveCampaign and can be used together to create highly targetted segments.
MOBLE integrate with ActiveCampaign via Tags not via Lists. This allows you to group a number of List with one Tag which offers a simple method to stay neat and tidy.
On MOBLE, as you start typing in the ActiveCampaign Tags field your ActiveCampaign Tags will automatically appear.
PLEASE NOTE
Before MOBLE Forms can be assigned to ActiveCampaign Tags you must first add your ActiveCampaign Tracking Code, ActiveCampaign API Key, and Event Key. It's important that you complete all the ActiveCampaign fields in the MOBLE Global Settings area, so let's get you started:
- Login to your ActiveCampaign Account
- Go to Settings
- ActiveCampaign Tracking Code
- Open the Tracking Page
- Follow the onscreen prompts ensuring that you turn the tracking status on and add your domain
(or click here for in-depth help https://help.activecampaign.com/hc/en-us/articles/221493708-How-to-set-up-Site-Tracking) - Go back to you MOBLE Global Settings Area (Found via the top left Menu Icon)
- Paste in the ActiveCampaign Tracking Code to the ActiveCampaign Tracking Code field and click Save.
- ActiveCampaign API URL and API Key
- Open the Developer Page
- Copy the API URL
- Go back to your MOBLE Global Settings Area (Found via the top left Menu Icon)
- Paste in the API URL to the ActiveCampaign API URL field and click Save.
- Go back to the Developer page on ActiveCampaign
- Copy the API Key
- Go back to your MOBLE Global Settings Area
- Paste in the API Key to the ActiveCampaign API URL field and click Save.
- ActiveCampaign Event Key
- Event tracking is also found via the Tracking page
- Please read this ActiveCampaign article to help you get set up.
- https://help.activecampaign.com/hc/en-us/articles/221870128-An-overview-of-Event-Tracking
- ActiveCampaign Tracking Code

The MOBLE integration with ActiveCampaign seen here in the Integrations section of the Global Settings Area.
WHAT'S NEXT?
DAY 2: EPISODES


Play before you Pay?
GETTING AROUND
SUPPORT
AI SALES LINE
AI SUPPORT LINE
ENQUIRIES
team@moble.com.au
GET A QUOTE
A Web Builder for Design. A CMS for Business. We serve all businesses from SME's to Enterprise. Talk with us for AI development, custom website design, website development, ecommerce websites, directories, intranets and social networks.
PRIVACY | WEBSITE TERMS | PLATFORM TERMS | © 2026 MOBLE PTY LTD